| ICY DOCK SSD/HDD RAID Enclosures for 5.25" Optical Drive Bay | |
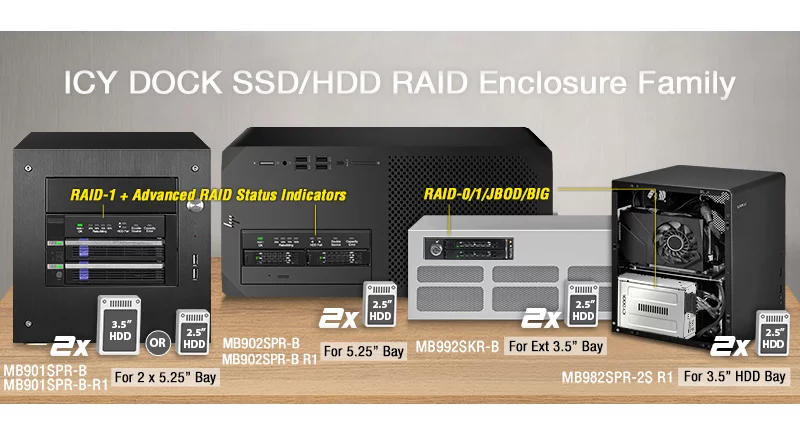
| • | Dual 2.5"+3.5" SATA Drive + HW RAID 1 & JBOD w/ Advanced RAID status Indicators – MB901SPR-B R1 |
| • | Dual 2.5" SATA SSD/HDD + HW RAID 1 & JBOD w/ Advanced RAID status Indicators – MB902SPR-B R1 |
| ICY DOCK SSD/HDD RAID Enclosures for External 3.5" Drive Bay | |
| • | Dual 2.5" SATA SSD/HDD + HW RAID-0/1/BIG/JBOD – MB992SKR-B |
| ICY DOCK 2.5" SSD/HDD to 3.5" HDD RAID Adapter for 3.5" HDD Bay | |
| • | Dual 2.5" SATA SSD/HDD + HW RAID-0/1/BIG/JBOD – MB982SPR-2S R1 (special order only) |
| • |
Fully SATA 3.0 Revision (6Gb/s) compatible and Backward compatible with SATA 2.0 Revision (3Gb/s) and 1.0 Revision (1.5Gb/s) drives
|
| • |
Supports SATA hot-swap function
|
| • |
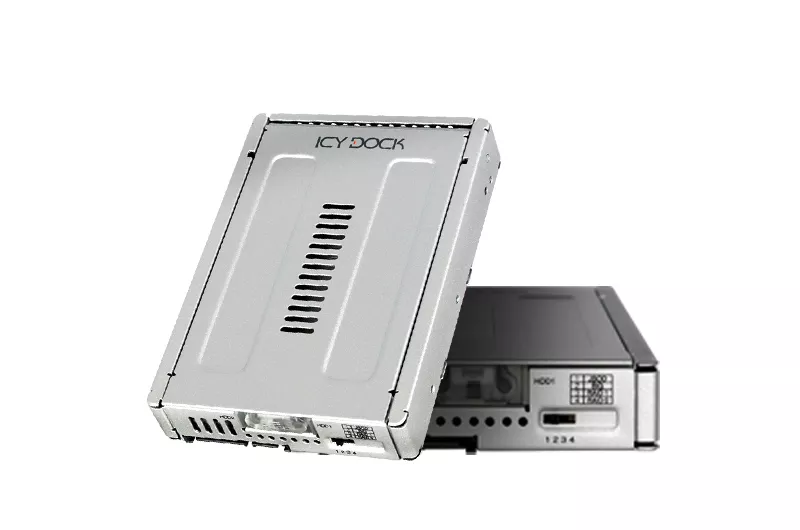
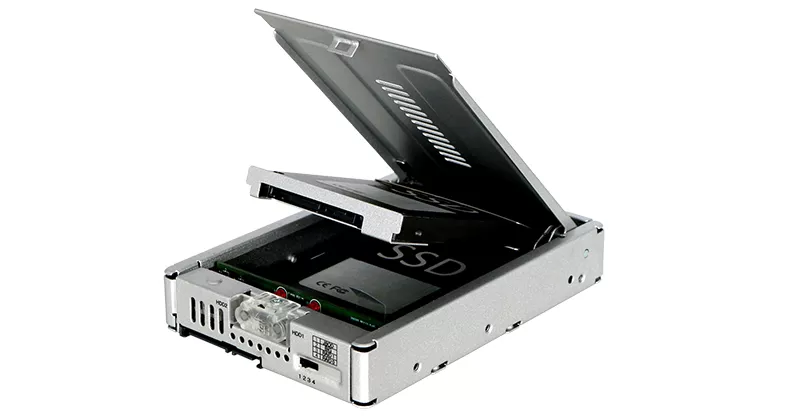
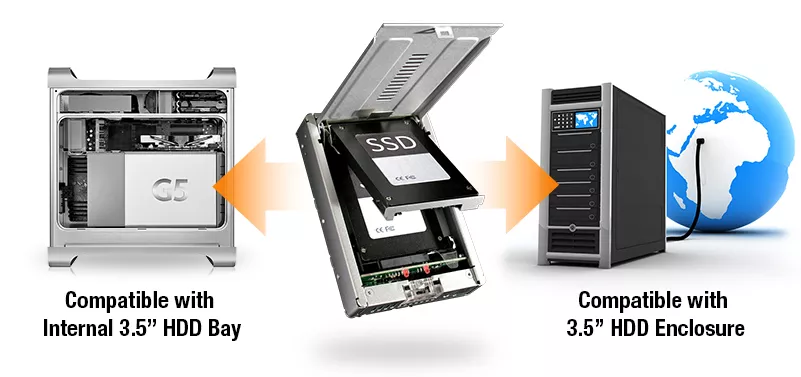
Converts 2 x 5mm to 9.5mm 2.5” SATA HDD or SSD into a 3.5” SATA hard drive
|
| • |
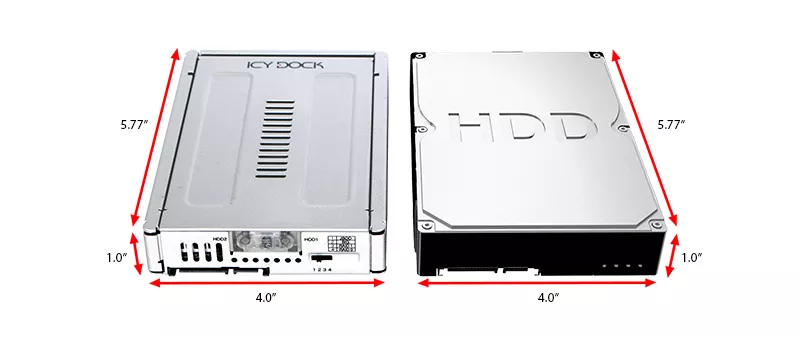
Exact same dimension, screw holes and connector locations as 3.5” hard disk drive
|
| • |
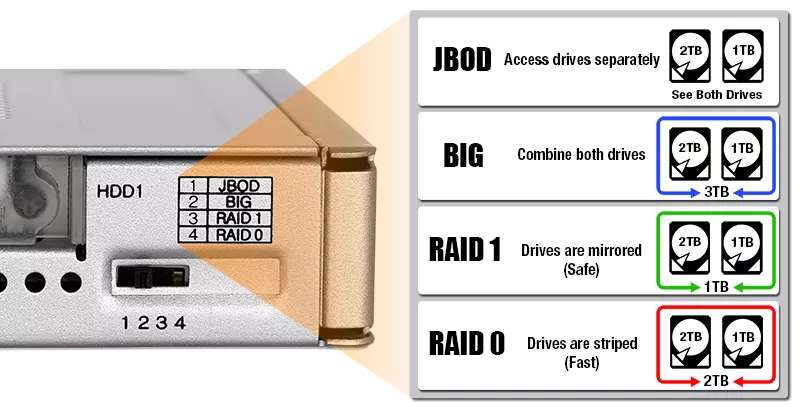
Built-in hardware RAID controller allows four different configurations: RAID 0 (FAST), RAID 1 (SAFE), JBOD and BIG (SPANNING)
|
| • | |
| • |
Patented tool-less drive installation design let you add / remove drives without dismount the converter
|
| • |
Full metal construction, perfect for rugged applications and complies with flammability requirements
|
| • |
Individual HDD fail LED indication located at rear of the device
|
| • |
EMI grounding – protects hard drives from electrical damage
|
| • |
Single SATA 15 pin power to power entire device & single SATA data connector to operate.
|
| • |
Limited 3 year warranty to complement the typical of a hard drive
|
| • |
Supports SATA cable with locking latch design
|
| • |
Airflow Vents with metal Heat Dissipation for maximum passive cooling
|
| • |
Compatible with backplane trays such as those found in Apple's first generation Mac Pro
|
| • |
Suggested applications in personal desktop computer, Mac system, gaming rig, network attached storage, surveillance system, POS system, video rendering workstation and enterprise data servers
|
| Model Number: | MB982SPR-2S R1 |
| Color: | Silver |
| Support Drive Size: | 2 x 2.5" SATA HDD & SSD (up to 9.5mm height) |
| Compatible Drive Type: | SATA |
| Number of Drives: | 2 |
| Max Drive Height: | 9.5mm |
| Drive Bay: | 1 x 3.5" device bay |
| Host Interface: | 1 x 7 pin SATA |
| Power Input: | 1 x 15 pin SATA power connector |
| Transfer Rate: | Up to 6Gbps (depending on hard drive speed) |
| Support HDD Capacity: | No limitation |
| Drive Cooling: | Metal heat dispersion with passive cooling |
| RAID Function: | RAID 0 (fast) / RAID 1 (safe) / BIG (large) / JBOD |
| Structure / Material: | Full metal |
| Support Hot-Swap: | N/A |
| Drive Security: | N/A |
| Product Dimension (L x W x H): | 146.6 x 101.6 x 25.4mm |
| Product Weight: | 360.7g |
| Shipping (Package) Weight: | 441.7g |
| RAID Status LED Indicator: | N/A |
| Drive Activity LED Indication: | HDD fail/RAID rebuild fail: solid red |
| Package Contents: | 1 - device, 1 - user manual, 4 - screws,2 - foam block |
| SATA Connector Insertion Rate: | 10,000 |
| Humidity: | 5%~65% RH |
| Operating Temperature: | 0°C to 60°C (32°F to 140°F) |
| Storage Temperature: | -35°C to 70°C (-31°F to 158°F) |
| Compliance: | CE, RoHS, REACH |
| Warranty: | 3 years |
Related Products:
Related Products Series:
Quick Link:
Q: What is RAID and what are different mode?
A: Note: Not all ICY DOCK enclosure support each of the RAID modes described below. For more information on the RAID modes that your enclosure supports, refer to the manual or the icydock.com product page.
Redundant Array of Independent Disks (RAID) is a virtual disk technology that combines multiple physical drives into one unit. RAID can create redundancy, improve performance, or do both.
RAID should not be considered a replacement for backing up your data. If critical data is going onto a RAID array, it should be backed up to another physical drive or logical set of drives.
The following are terms that normally used in connection with RAID:
• Striping: data is split between multiple disks.
• Mirroring: data is mirrored between multiple disks.
• Parity: also referred to as a checksum. Parity is a calculated value used to mathematically rebuild data.
Different RAID levels exist for different application requirements.
Refer to the following table for the list of RAID modes offered by some ICY DOCK products:
| RAID MODE | Description | Operation | Advantages | Disadvantages | Recovery |
|---|---|---|---|---|---|
| RAID 0 | Striped disks | Data is split evenly between two or more disks. | Large size and the fastest speed. | No redundancy. | If one or more drives fails, this results in array failure. |
| RAID 1 | Mirrored disks | Two drives have identical data on them. | A single drive failure will not result in data loss. | Speed and size is limited by the slowest and smallest disk. | Only one drive is needed for recovery. |
| JBOD | Just a Bunch Of Disks | Any number of drives are accessed independently by the operating system. | Software RAID modes can be used. | Hardware RAID may have better performance. | N/A |
| BIG | Spanning or Concatenation | Data is written on one drive until it is full, and then the next drive(s) until it or they are full. | Creates a very large and simple array. | No redundancy. | N/A |
Q: How do I setup or change the RAID mode for my MB982SPR-2S R1 RAID mobile rack?
A: Note: Any data currently on the drives will be lost during this process. You need to back up all of your data before you set a RAID mode.
To set a RAID mode, complete the following:
1.Turn off the computer.
2.Use a SATA cable to connect the MB982SPR-2S R1 RAID mobile rack to a computer.
3.Set the RAID switch to the RAID mode that you want to set.
4.Turn on the computer.
5.When the computer is turned on, check disk management to see if your RAID array is listed. If the RAID array listed with unallocated space, the RAID array needs to be reformatted.
Note 1: When you change the RAID mode, complete the steps above to set the unit back to JBOD before you set a different RAID mode.
Note 2: Your SATA controller card requires SATA port multiplier feature to read more than two drives in JBOD mode. If your computer is only recognizing one of your hard drives, it means your SATA controller does not support port multiplier feature. In this case, You can use the RAID monitoring software to verify the RAID model status. The RAID monitoring software can be downloaded here.
Note 3: Without port multiplier support, you can still see two drives in the RAID monitoring software under JBOD mode, this is because the RAID chipset can read two drives. However, to format each drive in Windows requires a port multiplier feature.
Q: How do I rebuild my RAID 1 array?
A:
1.Determine which drive is operational by using the RAID monitoring software (if available) or test each drive individually on a different hard drive enclosure or by connecting each drive directly to a computer’s SATA port.
2.Replace the failed drive with an identical hard drive.
3.The array will rebuild and is accessible during the rebuilding process.
Note 1: It is recommended to use a new identical hard drive for the rebuild. To use a used drive, we recommend use Window’s DiskPart command to clean and format the used hard drive before you start rebuilding.
Note 2: Before you start the rebuilding process, make sure the replacement drive has no previous RAID table in it. To erase the RAID table created by MB982SPR-2S R1, turn off the computer, insert the drive to the MB982SPR-2S R1 and set the RAID switch to JBOD mode and then turn on the computer. The RAID table will be erased once you successfully switch to JBOD mode. This procedure deleted all of the data on the drives. Make sure you back up all your data before you switch to JBOD mode.
Note 3: For better data security, when creating RAID 1 array, the JMS562 RAID chipset saves the RAID table to a deep layer (LBA) of the drive, which can only be erased by JMS562 chipset (MB982SPR-2S R1) in JBOD mode. Therefore, we recommend wiping the RAID table before you reuse any drive that ever used in MB982SPR-2S R1 with RAID 1 array.
Q: Will my hard drive or solid state drive work in this enclosure?
A:
• Make sure that the enclosure supports the storage size of your hard drive. If the storage size of your hard drive is larger than what the enclosure was tested with, the hard drive will likely still work with the enclosure.
• Confirm that your hard drive uses the same interface type as the enclosure. For example, IDE, SATA, or SAS.
• Make sure that the enclosure supports the physical size of your hard drive, such as 2.5 inches drive or 3.5 inches drive.
• Make sure that the enclosure supports the height of your hard drive. For example, 7mm, 9mm or 15mm.
• Verify that the power consumption of your hard drive doesn’t exceed the power output of the enclosure. If you’re using multiple hard drives, make sure that the combined power consumption of all of the hard drives doesn’t exceed the power output of the enclosure.
Q: My computer is only recognizing one of the hard drives while using SATA/eSATA. What do I do?
A:
SATA hard drive controllers require a feature called port multiplier to read more than one hard drive per SATA or eSATA port. The port multiplier feature is not standard on many SATA hard drive controllers.
If your computer is only recognizing one of your hard drives, you need to plug the SATA/eSATA cable into a SATA controller that includes the port multiplier feature. If none of your current hard drive controllers include this feature, you can add a hard drive controller that does support port multiplier in any available expansion slot (for example, PCI, PCI-Express, PCMCIA, CardBus, or ExpressCard).
If you have a hard drive controller card that does support the port multiplier feature but it is only reading one hard drive at a time, update the drivers of the hard drive controller.
Q: Everything is connected, but nothing is working. What do I do?
A:
When you troubleshoot issues with a hard drive enclosure, there are some quick tests that you can complete to rule out potential problems. You can test to make sure that the following components are working correctly and are not the source of the issue:
• Cables (USB, SATA, SAS, Mini-SAS, etc)
• Hard drives / SSD (M.2 drive, 3.5'' hard drive, solid state drive, etc)
• Hard drive enclosure (converter, mobile rack, cage, and external enclosure)
To test your setup components, try the following:
• Connect the hard drive directly to the system or use the hard drive in another enclosure to see if the problem is with the hard drive.
• Use the cables, hard drives, and hard drive enclosure in another setup to see if the problem is with the components or the setup.
• Use a different cable, hard drive, and hard drive enclosure in your setup to see if the problem persists. Ideally, you should test a component that you know works in another setup.
When you test the hard drive and hard drive enclosure, it is recommended that you do the following:
• To check Disk Management, press the Windows key + R, type diskmgmt.msc, and press Enter. Check to see if your hard drive is listed.
• If the hard drive is listed with unallocated space, the hard drive needs to be reformatted. Right-click unallocated and click New Simple Volume. Follow the on-screen instructions to complete the reformatting.
Note: Formatting a hard drive erases all of the data on it. Make sure that you back up all of your data before you reformat the hard drive.
• If the hard drive is listed as healthy but does not have a drive letter, for example, C:, right-click healthy and click Change Drive Letter and Paths. Click Add, assign a drive letter, and click OK.
Note: A formatted hard drive will not show up in Computer or My Computer until it has a drive letter assigned to it.
For additional help with setting ICY DOCK RAID enclosure, please contact us by email, phone, or live chat.
Q: Can I remove any hard drive from the MB982SPR-2S R1 RAID array, place it into a drive duplicator to copy data, and then return the hard drive back to the MB982SPR-2S R1 RAID array for continued use?
A: Any RAID array created through MB982SPR-2S R1 carries a unique RAID table, enabling the MB982SPR-2S R1 RAID chipset to recognize the RAID array information on the hard drive. This is crucial for data matching and RAID rebuilding in case of hard drive failure or data corruption. Removing a hard drive from the RAID array and copying data to it via a drive duplicator may corrupt the RAID table on that drive. This can lead to reading errors or a failure in RAID rebuilding process as the RAID chipset may no longer recognize it. As such, we strongly advise against removing hard drives from the MB982SPR-2S R1 RAID array for such purposes and also recommend not using the MB982SPR-2S R1 as a drive duplicator.
